Setting up a Rotifer culture (CCS-14L)
Live zooplankton such as rotifers are essential first-feeds for zebrafish larve. This protocol presents the material and the steps required for the production of zooplankton. It uses the Compact Culture System (CCS) developed by Reed Mariculture’s APBreed and is designed to make benchtop-scale culture of zooplankton easy and reliable.
Parts and Specifications
T-Assembly Parts Guide
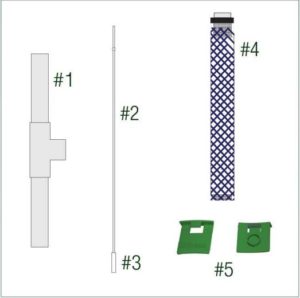
#1 – T-Assembly Support
#2 – Rigid Airline
#3 – Ayirstone
#4 – Floss Carrier Standpipe
#5 – CCS Clips
CCS Rotifer Culture Specifications
Assembly
1 – Remove Airstone
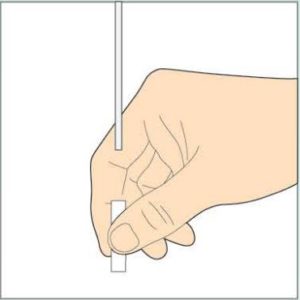
Pull airstone off the rigid airline.
2 – Insert Rigid Airline into T-Assembly
Push airline through the hole in the top of the T-fitting.

3 – Attach Standpipe
Insert top of floss carrier standpipe into T-fitting.

4 – Re-attach Airstone
Carefully slide airstone on to the end of the rigid airline.

Setup
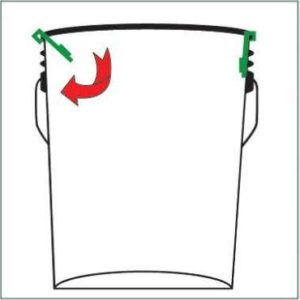
1 – Attach Clips to Bucket
Insert tab of clip under rim of bucket, swing tab into place against inside of bucket. Attach 2nd clip on opposite side of bucket.
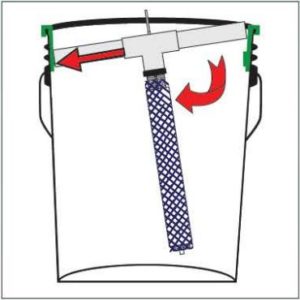
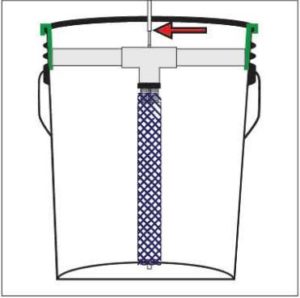
2 – Fitting T-Assembly into Bucket
Seat one arm of the T into a clip, push while holding onto opposite clip to deform rim of bucket and seat other arm in opposite clip.
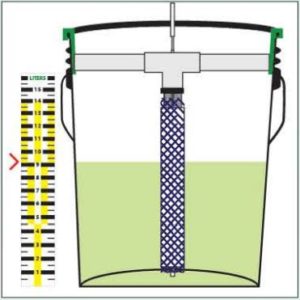
3 – Add 14 Liters Saltwater

Add 14 liters of saltwater, rotifer feed, and rotifer starter culture.
4 – Attach Air Source to Top of Rigid Airline
Seat bucket cover in place; stretch slightly to fit over clips. Attach tubing from air source to the rigid airline.
Maintenance
1 – Harvest Culture & Water Change
Once culture reaches desired density, harvest 20-30% each day.
2 – Clean Rotifer Floss
Deform bucket rim to release T from clips, lift T out of water and let free water drip into bucket. Flush waste from floss with strong spray of water.

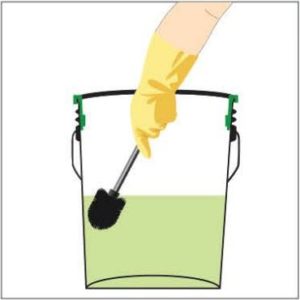
3 – Brush Bucket Surfaces
Brush interior surfaces of the bucket to remove adhering detritus, so it can be trapped and removed by the floss. Replace harvested volume with new saltwater.
4 – Feed Rotifer Culture
Re-install T into bucket clips, feed culture, re-attach cover, re-attach air supply.

Harvesting
Harvesting the Rotifer Culture
1 – It is best to harvest rotifers every day
2 – Approximately 30% is a good daily harvest rate
3 – If one day you need more rotifers, it is OK to harvest more heavily. To increase the number of rotifers harvested every day, increase the feed rate but keep a consistent harvest rate. For fewer rotifers just reduce the feed rate.
4 – To harvest rotifers, remove the appropriate volume of culture. The rotifers can be concentrated on a screen and collected, or you can simply pour the rotifer culture water into your tank.
5 – Replenish the rotifer culture with new saltwater.
Counting Rotifers
1 – Important: Stir culture first to ensure a representative sample
2 – Pipet a sample (typically 10 mL) into a vial. To immobilize the rotifers for counting, add 5 drops of vinegar and mix.
3 – Important: Stir sample so it is well-mixed and then quickly — before rotifers have time to settle out — use a pipet to transfer a known volume to a counting slide.
4 – Count the rotifers in that volume and calculate the number per mL or L.
5 – Your count should include at least 100 rotifers to be statistically reliable. If it is lower, count additional volumes.
6 – The most accurate counts are made with a Sedgewick-Rafter type slide that has a grid of 50 x 20 = 1,000 squares. You can count the rotifers in 100 squares and multiply by 10 to get the number of rotifers/mL. If the number is below 100, count more squares; if you count 200 squares, multiply by 5.
Sorry, the comment form is closed at this time.